C4D+PS视觉广告制作案例教程 Advertising visual in Photoshop and Cinema 4D

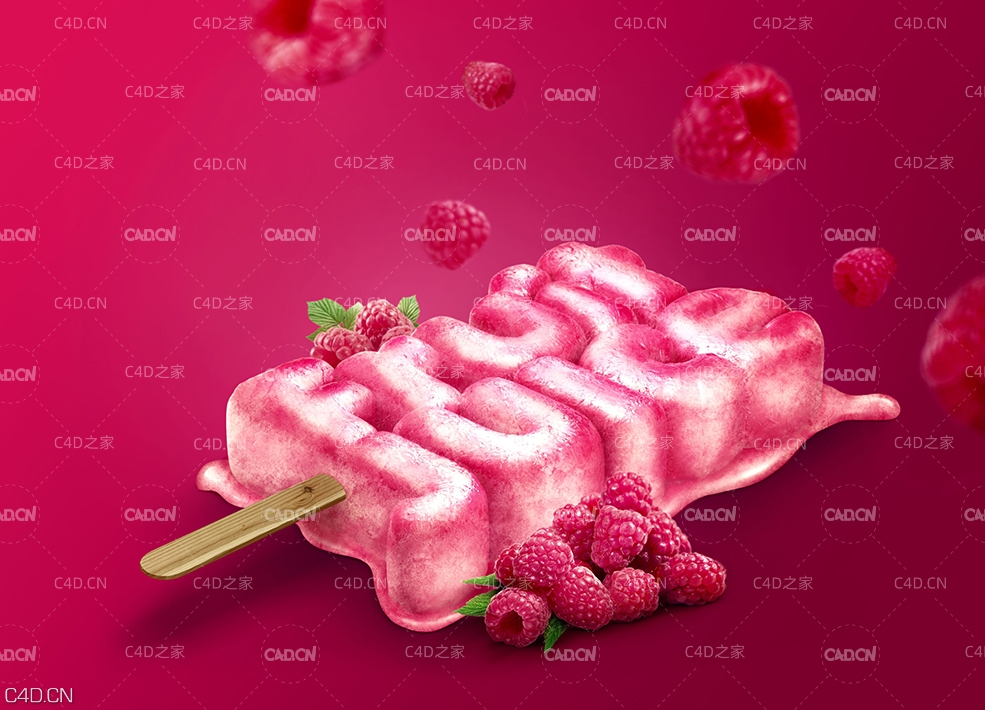
In this project based course I`ll show you how to create 3d typography in Cinema 4d, how to apply simple materials and render different passes which you can use for compositing. You don`t need to be an expert in CInema 4d, you might even open it for the first time. It is very intuitive and easy to follow program and I`ll explain every step on the way.
Next, I`ll walk you through the process of adding details and elements to your typography in Photoshop. We`ll learn how to create melted liquids, paint shadows and lights and use brushes to add more detailed textures. For this it`s preferable that you have basic knowledge of Photoshop, such as understanding of the layer masks, clipping masks, adjustments layers and blending modes Since I`ll concentrate more on advanced technics and tricks that will help to get all elements together and create believable composite.
At the end of this course you`ll have one more work to put to your portfolio and hopefully a ton of ideas for your next projects.
The course contains of 5 Parts.
Part 1: Sketching your idea
Part 2: Creating base shape in Cinema 4d
Part 3: Adding lights and materials in Cinema 4D. Rendering
Part 4: Adding textures and melted liquid to the typography ice cream in Photoshop
Part 5: Working with composition, adding raspberries, depth of field and final color grading in Photoshop
Who is this course for:
This course is for creative designers and retouchers who want to bring their skills to the next level. As well as for those, who are thinking to change focus of their career and became commercial retoucher.
Who this course is for:
Anyone who has a basic knowledge in photoshop
Anyone who wants to learn basics of Cinema 4D
Course content
Welcome. Part 1
Introduction
Sketching your idea
Part 2.
Modeling the first letter
Phrase modeling
Adding floor and ice cream stick
Part 3.
Adding lights
Adding materials to the ice cream
Compositing passes and render settings
Part 4.
Importing passes and render image to Photoshop. Adding colorful background
Adding melted liquid and standing shadow for it
Adding ice frost texture to the ice cream
Adding wooden texture to the stick. Painting ice cream shadows and highlights
Part 5.
Adding raspberries in front and behind ice cream. Drawing realistic shadows
Creating depth of field by adding raspberries
Final color correction
|
|
 C4D灯光/模型/环境预设文件 BLOG POST 2: VI STUDIO PACK – CINEMA 4D
 C4D环境、模型、工程、灯光合集预设文件 visual intelligence studios pack
 C4D作品欣赏:字母创意展示 C4D works
 C4D+AE特效合成教程 Tutsplus – Visual Effects Compositing in Adobe After Effects
 C4D AE特效合成教程 Tutsplus – Visual Effects Compositing in Adobe After Effects
 Is a sad day for the visual effects industry, Matte World Digital has just close


![C4D粒子模拟插件免费下载[含插件使用教程] FoxParticles For Cinema 4D R21-2025 C4D粒子模拟插件免费下载[含插件使用教程] FoxParticles For Cinema 4D R21-2025](data/attachment/forum/threadcover/cb/c0/84897.jpg)


Comment :5